The Seabrook Photography Club would like to invite SIB Members to attend a special presentation by Colin Hocking on May 16, 2924 at 6:30 PM. Although the event is focused on wildlife photography, Colin specializes in Bird Photography.
SIPOA Lake House, Live Oak Room. Guest Fee reduced to $5 for SIB Members
About Colin and the Program:
Colin Hocking – “Snap Shot to Pro Shot: Steps to Raise Your Wildlife Photography Game!”
Join professional wildlife photographer and photo tour leader Colin Hocking as he shares the steps, settings, and techniques it takes to capture those “once in a lifetime” moments that we might otherwise miss!
Colin is a Licentiate of the UK Royal Photographic Society, a Coastal Master Naturalist, and a member of the Professional Photographers of America and the Carolinas Nature Photography Association. He has been a freelance photographer for over 20 years and leads successful photo tours all over the Lowcountry. His combination of technical photography skills and his naturalist training allows him to approach nature photography with a hybrid of artistic and scientific perspectives.
Recently, a group of SIB members were discussing some ideas to help improve our birding skills, and the more we talked about it, the longer our list became. So we decided to write a blog and share our tips with our fellow birders. There are so many good ideas that we can split them into two blogs!
These tips are a gold mine of information for the new birder, and excellent reminders (and probably some new “ah-hah!” moments) for those who’ve been birding for a year, or ten years!
The most important features of birding are its fun, it can be done anywhere in the world, and you don’t need to be an expert. If you’re brand new to birding, or you’ve been birding for a couple of years, there are lots of ways to increase your skills and enhance your experience, so let’s get started!
Binoculars
Jen Jerome suggests getting a good pair of binoculars. Bob Mercer recommends buying the highest quality you can afford. A high quality pair can last a lifetime. A cheap pair will wear out, but can be a good starter.
Bob suggests when buying optics, do not get tricked into buying something too powerful or too small. The number on a pair of binoculars indicates the magnification and the width of the large lens in millimeters. Examples include 7×35 or 8×40. There is a sweet spot in size where you divide the magnification by the lens, and you want to be near 5, as in these two examples. Recognize that the higher your magnification (the first number), the more everything, including your body motion, is magnified. Binoculars that are too small will be difficult for finding the birds.
Once you have the pair you want, spend time making sure your binoculars are set for your eyes and remember the setting so you can adjust as needed. Before each outing, make sure your equipment is clean and packed. Bob says he can remember the number of times he showed up and the binoculars were not with him.
Bob also encourages people to practice lifting their binoculars to their eyes in such a way that the desired object is right where you want it. Do this before you start looking for birds—they move!
Jen Jerome also found that taking pictures is a great way to learn. A picture, even a poor quality one, allows you to study the field marks at your leisure. A bird may be in sight only a couple of seconds, giving you a brief window of observation.
Field Guides
Eileen Mercer suggests you “keep studying the bird books, articles and apps.” Purchase at least one good field guide. These can be paper or digital and best to have each type. Most field guides are arranged in taxonomic order. Spend your free time studying your guide(s). Know how to search for things before you get out in the field. Note shape, size, and behavior.
Judy Morr also recommends studying the habitat of the birds you’re hoping to see as that will help you know where to look. Do they forage up high or down low, near the ground? In brush and bushes, or up in trees? Do they feed on the ground? Knowing where to start looking is very helpful.
Bob Mercer suggests you purchase two duplicate books. One to take in the field and one to keep safe at home. Go through the one for the field and make notations as to the key field marks. The original field guides by Roger Tory Peterson used lines to point to the most obvious field mark. New books have far surpassed the Peterson Series in identification tips, but do not include the lines. Create your own. The second book is where you keep your life list and other records. More on that later.
Melanie Jerome recommends that as you study the birds in your books or apps, pay attention to not just color and shape, but look at the beak also, as it tells a lot about a bird.
Two resources to help you predict what you can expect to see on your outing are ebird and Birdseye apps. Judy Morr finds these two resources invaluable in helping her prepare for an outing.
In The Field
Aija Konrad and many other SIB members recommend going on as many guided bird walks as you can. Let those who are more knowledgeable help you. Ask questions, don’t reinvent the wheel! Keep a list and when you return home go back through the list and double check what you saw to refresh your memory as to the characteristics of the various birds.
Joleen Ardaiola encourages people to find at least one other person to bird with. “The other person you bird with doesn’t always have to be an expert (even though you learn a lot that way too), but someone who is interested in taking the time with you to figure out what the bird is. I think you learn better if you’re not immediately told what the identity of the bird is.” This is why SIB has “Learning Together” activities. Even the “experts” are constantly learning new things.
Bob Mercer learned the hard way that when you look for those small birds, as you lift your binoculars up, don’t look for the bird. Look for a pattern in the branches or something distinctive in the vicinity of the bird. Birds fly, and frequently they fly in that brief moment as the binoculars block your view. If you find the pattern and no bird is there, you can stop wasting time looking.
Bob also suggests that people use their ears, not just their eyes. You can hear things that are invisible. Field experience is the best way to learn bird sounds. He recommends the Merlin app. It uses AI to identify sounds. It is FAR from infallible, do not assume Merlin is always right. For example, Northern Mockingbirds skillfully mimic the sounds of other birds. Merlin can tell you what to look for. Once you make a Merlin recording, keep it. Once back home, go through your recordings and listen again for the bird. Click on the bird’s name and it will give you a whole bunch of sounds that bird makes. Pick out the sound you heard in the field. This is a GREAT way to learn bird sounds.
Bob also encourages everyone to start a life list. This is a list of each bird you identified for the first time. Mark down the date and location in both of your books, the one in the field and the one that never goes out in the field. If you get serious, you will want to keep the list in multiple locations as a failsafe. Bob Mercer painfully remembers losing his life list in the book taken into the field. As people grow serious, they can become listers: life list, North American list, world list, state list, year list, etc. Ebird automatically keeps these lists for you. Listing does two things. It provides a great memory recall, but it also creates a challenge to find something new.
These are excellent tips to get you started birding, or to take your birding to the next level and improve your skills. But wait, there’s more! Keep watching for part two, where we share practical tips on making your outings even more enjoyable.
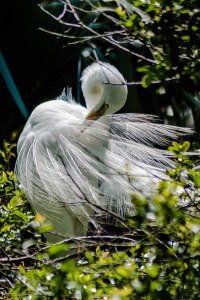
Great Egret – Ardea alba
Length: 39″; Wingspan: 51″; Weight: 30 oz.
Great Egret – Charles Moore
The Great Egret, is also known as the White Egret, Common Egret, Great White Egret or the Large Great Egret. It occurs in tropical and warm temperate regions of the world including Central Europe, Africa, Asia, Australia, New Zealand, and portions of North, Central and South America.
Standing over three feet tall, the Great Egret is the largest white bird within its range and is distinguished from similar birds by its large size, solid white plumage, yellow bill, and dark grey to black legs and feet.
Great Egret – Charles Moore
Great Egret – Charles Moore
The neck of the Great Egret is extremely flexible and an adult bird can swallow a one-pound fish with ease, an amazing feat considering that on average adult birds may weigh just over two pounds themselves.
Each breeding season they carry out elaborate courting displays and behaviors and they are believed to be monogamous during a breeding season. It is unknown if they mate for life.
Great Egret – Charles Moore
Males establish a territory, select a nesting site, begin to build a nest and initiate mating displays that attract females. Breeding plumage consists of numerous delicate ornamental feathers. The birds display these feathers by holding them up, puffing them out, and spreading them over their backs. At the same time they extend their neck skyward and pump it up and down several times. Great Egrets make dry, croaking sounds, nasal squeals, and other harsh calls. They are particularly vocal during breeding season as they go about establishing territories, courting, forming pairs, and maintaining pair bonds. You just might hear something that sounds like this near their rookeries around the island.
Nests may be 100 or more feet high and frequently are directly above water. They are about three feet across, a foot deep, and lined with Spanish moss or other soft vegetation. Nests are continually repaired during the nesting season.
Great Egret – Charles Moore
Typically two to four light blue-green eggs appear over a several day period and the adults alternately sit on the eggs. Hatching occurs in 23 to 27 days. Chicks are very aggressive and frequently weaker chicks are tossed out of the nest and don’t survive.
Initially, the parents regurgitate food into the nest but once the chicks are of sufficient size the parent bird feeds the chicks by placing its bill completely inside the mouth of each waiting chick.
Great Egret – Charles Moore
Great Egret – Charles Moore
Great Egret – Charles Moore
Newborn chicks have long thin fuzzy feathers that protrude from their head as if they are affected by static electricity.
Five to six weeks after hatching the chicks attempt their first flights. The average life span of a Great Egret is 15 years but some have been known to live more than twenty years in captivity.
Adult Great Egrets have no predators and only crows, vultures, and raccoons are reported to prey on the eggs and fledglings. However, their beautiful plumage nearly resulted in their demise. Ninety-five percent of the North American Great Egret population was killed for feathers to decorate hats and other clothing items in the 19th century.
Great Egret – Charles Moore
Today, national and international treaties protect the Great Egret and their populations are thriving in North America. Their greatest threat today is the loss of habitat through drainage and the clearing of wetlands. The logo of the National Audubon Society is the Great Egret in full flight. This logo symbolizes the success of past and current conservation efforts protecting these magnificent birds and serves as a constant reminder that without such conservation efforts many to the world’s most beautiful wonders would be lost forever.
If you would like to learn more about this bird visit:
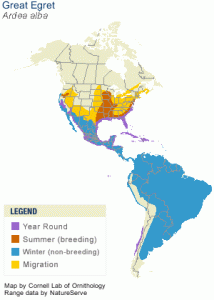
Range map of Great Egret – Cornell Lab of Ornithology
Article submitted by: Charles Moore
Resubmitted 2024 SIB
Photographs provided by: Charles Moore
This blog post is part of a series SIB will publish on a regular basis to feature birds seen in the area, both migratory and permanent residents. When possible we will use photographs taken by our members. Please let us know if you have any special requests of birds you would like to learn more about.